Developer Guide
- Acknowledgements
- Setting up, getting started
- Design
- Implementation
- Documentation, logging, testing, configuration, dev-ops
- Appendix: Requirements
-
Appendix: Instructions for manual testing
- Launch and shutdown
- Adding a candidate
- Editing a candidate
- Deleting a candidate
- Scheduling an interview
- Deleting an interview
- Viewing the interview schedule
- Updating a candidate’s remark
- Sorting candidates in the system
- Finding candidates in the system
- Bringing candidate data to center panel
- Saving data
Acknowledgements
Setting up, getting started
Refer to the guide Setting up and getting started.
Design
.puml files used to create diagrams in this document can be found in the diagrams folder. Refer to the PlantUML Tutorial at se-edu/guides to learn how to create and edit diagrams.
![]() Note about
Note about AddressBook named classes/packages:
TAlent Assistant™’s development team has decided to stick with AB3’s naming convention for certain classes or the application’s package, unless otherwise stated.
Architecture
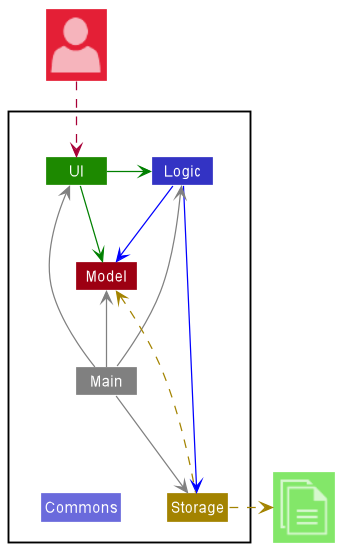
The Architecture Diagram given above explains the high-level design of the App.
Given below is a quick overview of main components and how they interact with each other.
Main components of the architecture
Main has two classes called Main and MainApp. It is responsible for,
- At app launch: Initializes the components in the correct sequence, and connects them up with each other.
- At shut down: Shuts down the components and invokes cleanup methods where necessary.
Commons represents a collection of classes used by multiple other components.
The rest of the App consists of four components.
-
UI: The UI of the App. -
Logic: The command executor. -
Model: Holds the data of the App in memory. -
Storage: Reads data from, and writes data to, the hard disk.
How the architecture components interact with each other
The Sequence Diagram below shows how the components interact with each other for the scenario where the user issues the command delete 1.
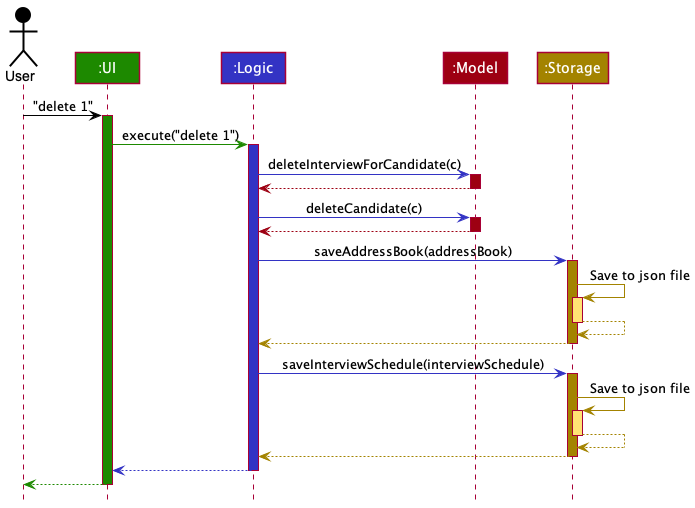
Each of the four main components (also shown in the diagram above),
- defines its API in an
interfacewith the same name as the Component. - implements its functionality using a concrete
{Component Name}Managerclass (which follows the corresponding APIinterfacementioned in the previous point.
For example, the Logic component defines its API in the Logic.java interface and implements its functionality using the LogicManager.java class which follows the Logic interface. Other components interact with a given component through its interface rather than the concrete class (reason: to prevent outside component’s being coupled to the implementation of a component), as illustrated in the (partial) class diagram below.

The sections below give more details of each component.
UI component
The API of this component is specified in Ui.java
![]() Notes about UI Class Diagram:
Notes about UI Class Diagram:
To make things more concise and for neatness, we have taken out the UIPart abstract class.
All classes associated with MainWindow and itself are connected to this abstract class (Again, not shown in the image below).

The UI consists of a MainWindow that is made up of parts e.g.CommandBox, ResultDisplay, CandidateListPanel, InterviewListPanel, FocusCard, StatusBarFooter etc. All these, including the MainWindow, inherit from the abstract UiPart class which captures the commonalities between classes that represent parts of the visible GUI.
The UI component uses the JavaFx UI framework. The layout of these UI parts are defined in matching .fxml files that are in the src/main/resources/view folder. For example, the layout of the MainWindow is specified in MainWindow.fxml
The UI component,
- executes user commands using the
Logiccomponent. - listens for changes to
Modeldata so that the UI can be updated with the modified data. - keeps a reference to the
Logiccomponent, because theUIrelies on theLogicto execute commands. - depends on some classes in the
Modelcomponent, as it displaysCandidateorInterviewobject residing in theModel.
Logic component
API : Logic.java
Here’s a (partial) class diagram of the Logic component:
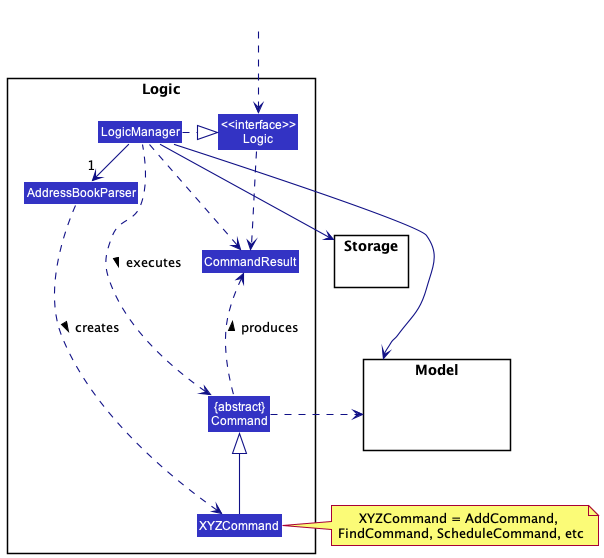
How the Logic component works:
- When
Logicis called upon to execute a command, it uses theAddressBookParserclass to parse the user command. - This results in a
Commandobject (more precisely, an object of one of its subclasses e.g.,AddCommand) which is executed by theLogicManager. - The command can communicate with the
Modelwhen it is executed (e.g. to add a candidate). - The result of the command execution is encapsulated as a
CommandResultobject which is returned back fromLogic.
The Sequence Diagram below illustrates the interactions within the Logic component for the execute("delete 1") API call.
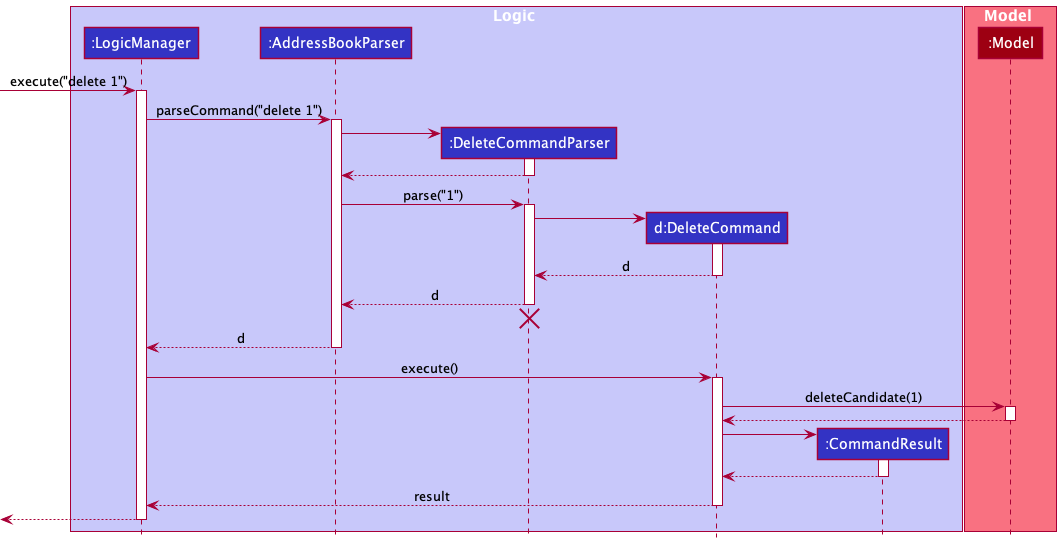
DeleteCommandParser should end at the destroy marker (X) but due to a limitation of PlantUML, the lifeline reaches the end of diagram.
Here are the other classes in Logic (omitted from the class diagram above) that are used for parsing a user command:
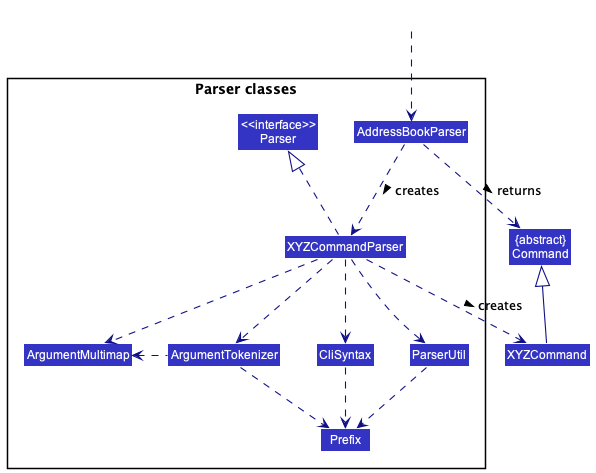
How the parsing works:
- When called upon to parse a user command, the
AddressBookParserclass creates anXYZCommandParser(XYZis a placeholder for the specific command name e.g.,AddCommandParser) which uses the other classes shown above to parse the user command and create aXYZCommandobject (e.g.,AddCommand) which theAddressBookParserreturns back as aCommandobject. - All
XYZCommandParserclasses (e.g.,AddCommandParser,DeleteCommandParser, …) inherit from theParserinterface so that they can be treated similarly where possible e.g, during testing.
Model component
API : Model.java
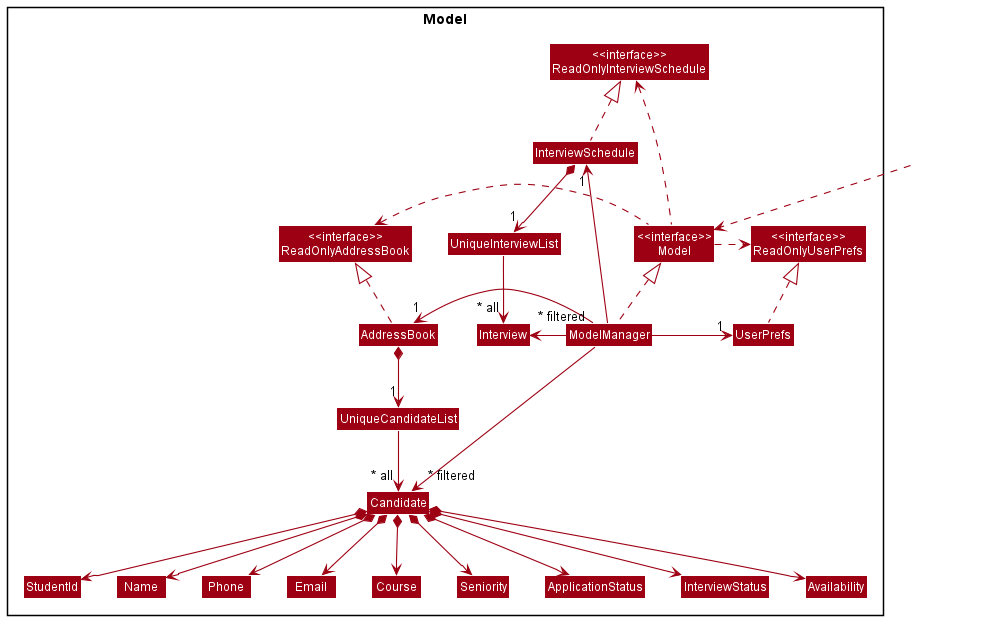
The Model component,
- stores the TAlent Assistant™’s data i.e., all
Candidateobjects (which are contained in aUniqueCandidateListobject). - stores the currently ‘selected’
Candidateobjects (e.g., results of afindorsortquery) as a separate filtered list which is exposed to outsiders as an unmodifiableObservableList<Candidate>that can be ‘observed’ e.g. the UI can be bounded to this list so that the UI automatically updates when the data in the list change. - stores Candidates’
Interviewobjects (which are contained in aUniqueInterviewListobject). - stores the currently ‘selected’
Interviewobjects as a separate filtered list which is exposed to outsiders as an unmodifiableObservableList<Interview>that can be ‘observed’ e.g. the UI can be bounded to this list so that the UI automatically updates when the data in the list change. - stores a
UserPrefobject that represents the user’s preferences. This is exposed to the outside as aReadOnlyUserPrefobjects. - does not depend on any of the other three components (as the
Modelrepresents data entities of the domain, they should make sense on their own without depending on other components)
Storage component
API : Storage.java
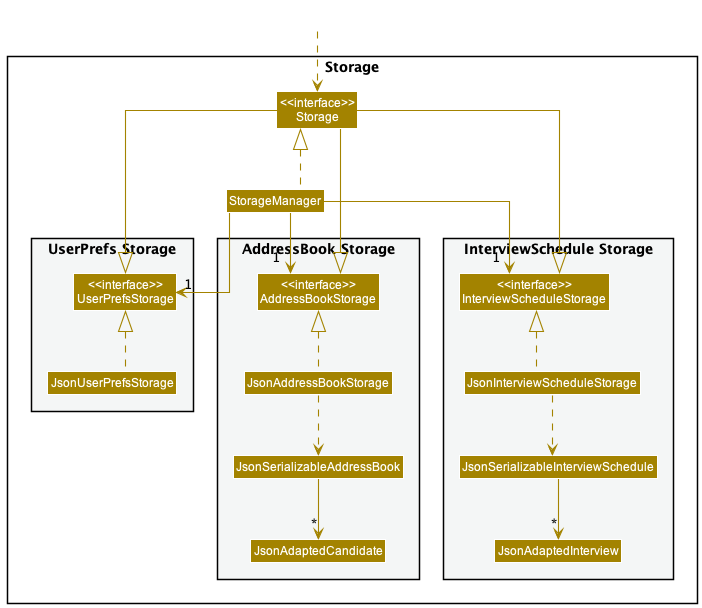
The Storage component,
- can save address book data, interview schedule data and user preference data in json format, and read them back into corresponding objects.
- inherits from
AddressBookStorage,InterviewScheduleStorageandUserPrefStorage, which means it can be treated as either one (if only the functionality of only one is needed). - depends on some classes in the
Modelcomponent (because theStoragecomponent’s job is to save/retrieve objects that belong to theModel)
Common classes
Classes used by multiple components are in the seedu.addressbook.commons package.
Implementation
This section describes some noteworthy details on how certain features are implemented.
![]() Note about
Note about AddressBook named classes:
TAlent Assistant™’s development team has decided to stick with AB3’s naming convention for certain classes, unless otherwise stated.
Add feature
What is the feature about?
The add mechanism is facilitated by AddressBook. The implementation of adding a Candidate through the add command has been enhanced on the existing approach. It extends Command. The input parameters of the add command has been tweaked, introducing a few more related attributes.
The enhancement works by adding additional prefixes i.e. id/[StudentId], c/[Course], yr/[Seniority], avail/[Availability]. As for the attributes ApplicationStatus and InterviewStatus, users are not required to enter a value for it as the default value of PENDING will be assigned.
How is the feature implemented?
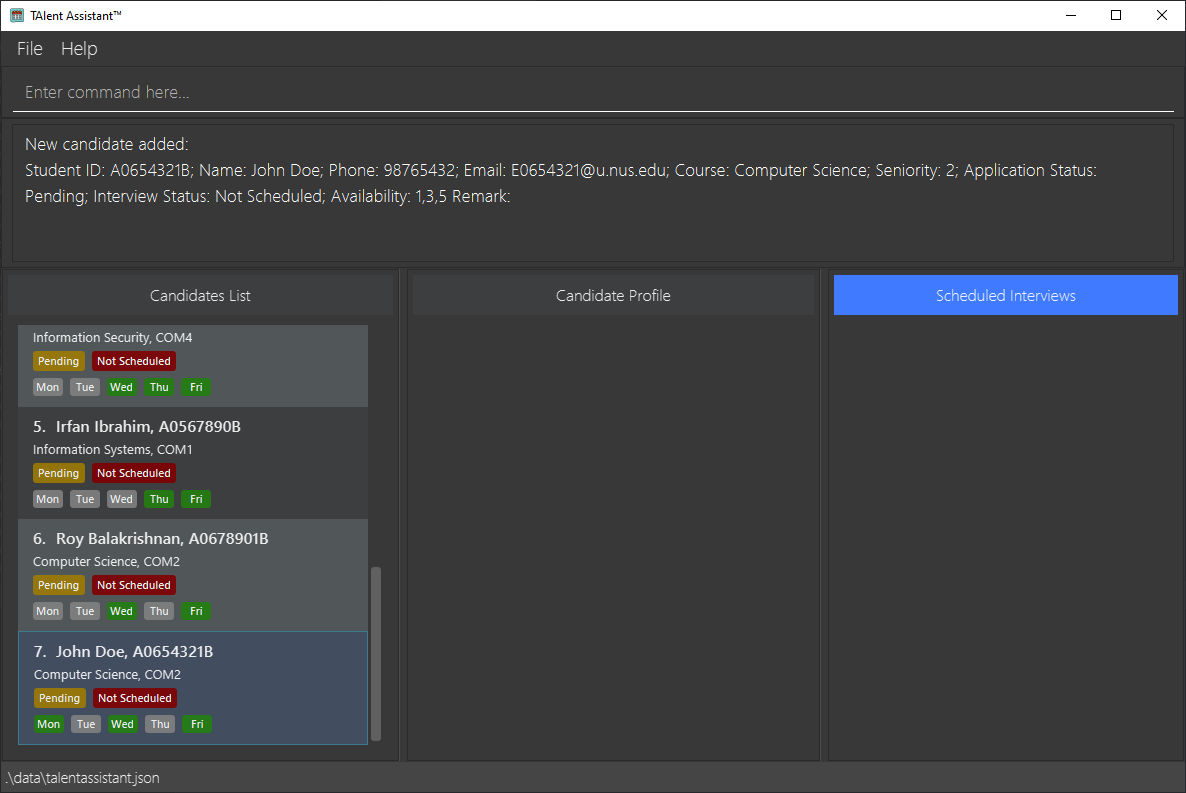
Given below is an example usage scenario and how the add mechanism behaves at each step.
clear command for a fresh state.
Step 1. The user launches the application for the first time. The program will be initialised with the preloaded data.
Step 2. The user proceeds to add a candidate by running the add command with its necessary arguments. The image provides an example of this step.
Why is the feature implemented as such?
The add command is done up with the goals of being as convenient and efficient as possible for the users. It is kept simple with easy to interpret and understandable prefixes that convey to the user on what is expected from their input.
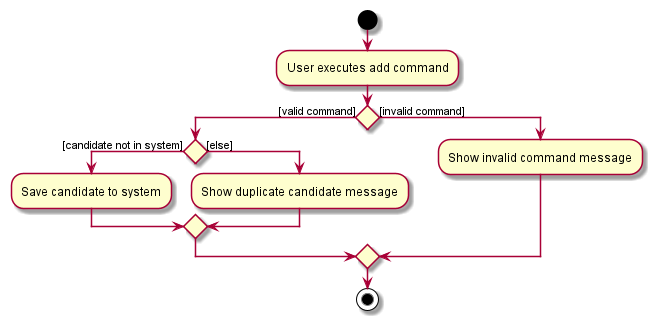
UML Diagrams
Activity Diagram
The following activity diagram summarizes what happens when a user executes an add command:
ApplicationStatus Feature
What is the feature about?
This feature implements a tagging system attached to the Candidate’s profile in our Application. This way, our user can
easily see which candidates are Accepted, Rejected, or Pending. This will help enhance user experience when using our application.
How is the feature implemented?
This feature is currently embedded into the EditCommand feature. Currently, a user could edit the ApplicationStatus by using the
using the Edit command.
Why is the feature implemented as such?
We designed this tagging system is such a way that when a user is first added into the system, the user’s ApplicationStatus
will be set to default of pending. This will help the user to minimise the amount of commands to type when adding in a Candidate.
The ApplicationStatus is currently implemented as a class by itself, and each Candidate has an ApplicationStatus embedded into their profile.
To change their status, the EditCommandParser will look out for the prefix to change the status, and will change their status accordingly.
In the initial phase of the project, we wanted the ApplicationStatus to be a String inside the Candidate. However after much consideration,
we have decided to make it a class of its own. This way, we can defensively design and code the ApplicationStatus and prevent any rouge data
from being entered.
UML Diagrams
Activity Diagram
The following activity diagram summarizes what happens when a user executes a Edit ApplicationStatus command:

InterviewStatus Feature
What is the feature about?
This feature implements a tagging system attached to the Candidate’s profile in our Application. This way, our user can
easily see which candidates are Scheduled, Not Scheduled, or Completed. This will help enhance user experience when using our application.
How is the feature implemented?
This feature currently uses our trigger inside the Candidate class, namely Candidate#triggerInterviewStatusNotScheduled(),
Candidate#triggerInterviewStatusScheduled() and Candidate#triggerInterviewStatusCompleted().
When a Candidate is scheduled for an interview, it will trigger the InterviewStatus of the Candidate to be scheduled.
When a Candidate’s interview is over, the trigger will automatically mark the Candidate’s InterviewStatus as completed.
If an interview date is deleted prematurely, the InterviewStatus of the Candidate will be reverted back to Not Scheduled.
Why is the feature implemented as such?
We designed this tagging system is such a way that when a user is first added into the system, the user’s ApplicationStatus
will be set to default of Not Scheduled. This will help the user to minimise the amount of commands to type when adding in a Candidate.
In the initial planning phase of the project, we intended for the InterviewStatus to be triggered by many factors, such as ApplicationStatus,
the current date and time, etc.
However by coupling these two statuses together, the user will have lesser flexibility to change either ApplicationStatus or `InterviewStatus.
Hence we decided to keep them independent.
We also decided that when an interview is deleted prematurely, that the InterviewStatus will revert back to not scheduled, as it will help to differentiate
which Candidate has yet to be scheduled.
We also implemented a blocking system, such that if a Candidate has completed their interview, the system will not be able to schedule them for
another interview (by checking their InterviewStatus)
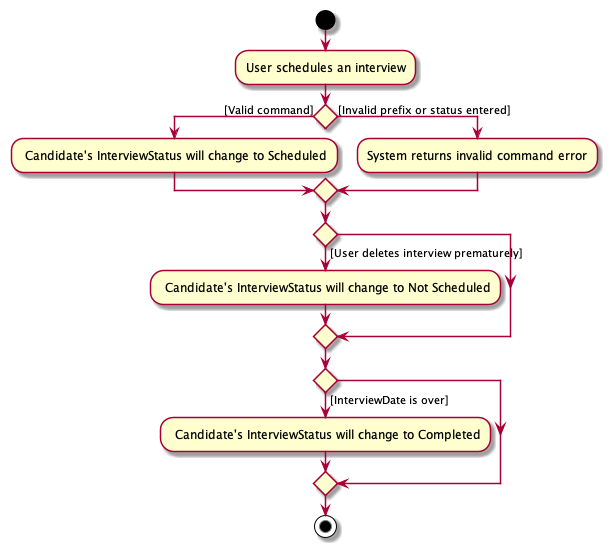
UML Diagrams
Activity Diagram
The following activity diagram summarizes what happens for the InterviewStatus
Find feature
What is the feature about?
The find mechanism is facilitated by AddressBook. The find command in TAlent Assistant™
has been enhanced based on the initial implementation of the find command in AddressBook.
The enhancement works by adding a new prefix in the CliSyntax class k/, which allows the
user to separate multiple keywords and f/ which allows the user to specify which field the
find command should search for keywords under.
How is the feature implemented?
The main logic for find command is still implemented within FindCommand (which extends from Command) and
FindCommandParser.
The FindCommandParser class has been extended to include a switch-case block to validate
which field the user is trying to search across:
studentIdcoursesenioritynameemailphone-
appStatus(stands for candidate’s application status) -
intStatus(stands for candidate’s interview status) -
avail(stands for candidate’s availability) -
all(i.e. search across all fields of the candidate)
Based on the field validated by the switch-case block, a new findCommand(new ContainsKeywordsPredicate(keywords))
will be created. The implementation of the original NameContainsKeywordsPredicate has been enhanced here.
There is now a ContainsKeywordsPredicate parent abstract class extended by each of the above listed fields as subclasses
(e.g. StudentIdContainsKeywordsPredicate extends ContainsKeywordsPredicate).
Why is the feature implemented as such?
1. Switch-case block in FindCommandParser
Other alternatives considered included creating a separate class to execute the logic of checking for which field the
user had entered and return the new ContainsKeywordsPredicate subclass or to utilise if-else statements.
In the end, the implementation was done using the switch-case block within the FindCommandParser class, as the
class should contain all the necessary logic to parse in the user’s input. The syntax for the switch-case block was
also more efficient than if-else statements and was more relevant for this usage.
2. Inheritance of ContainsKeywordsPredicate to child classes
Other alternatives considered included creating one single ContainsKeywordsPredicate class to implement all the
equality and keyword match checks for each and every field.
However, this would not meet good design principles - this would make it difficult to isolate and resolve bugs during
testing and make scalability and maintainability more complicated.
Further, since all the child classes implement similar logic and methods, it would make sense to create an
(abstract) parent class. This establishes the SRP principle, such that each subclass is only responsible for
checks for the specific related entity, and should not have any other reason to change otherwise.
3. Allowing searches across multiple fields
Currently the find command is implemented such that the parser will only validate the last ATTRIBUTE_FIELD parsed in
by the user, and execute the ContainsKeywordsPredicate test against it. An alternative was to allow searches across multiple
ATTRIBUTE_FIELDS. Though this is implementable by checking the validity of each of the ATTRIBUTE_FIELD parsed in,
it is considered out of scope in this particular iteration. Given as all the fields hold extremely different values,
the user is unlikely to be searching for the same set of keywords across multiple fields. Instead, following the behaviour
of other commands, the FindCommandParser will take in the last f/ prefix.
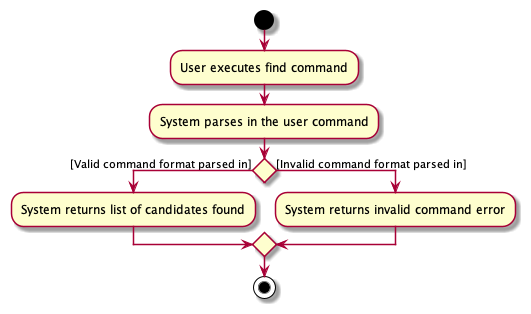
UML Diagrams
Activity Diagram
The following activity diagram summarizes a high level view of what happens when a user executes a find command:
Sort feature
What is the feature about?
The sort mechanism utilises the existing command class model from AddressBook. It introduces new methods and modifies current
implementation of existing methods in order to allow the user to sort the displayed candidates list by a specific
field.
A new s/ prefix is added in the CliSyntax, which is used to accurately parse in the ATTRIBUTE_FIELD that the user
would like to sort the displayed candidate list by. The implementation in SortCommand class works by calling
model.updateSortedCandidateList(sortComparator), which updates the sorted order of the existing CandidateList in the system.
How is the feature implemented?
The parser for the sort command works similarly to all other commands implemented. In this case, as the user
may potentially key in multiple valid s/ prefix fields, we utilise the ArgumentTokenizer in order to parse
in all the inputs, and only utilise the last s/ prefix field.
The main logic for executing the sort command works within the ModelManager and AddressBook classes. When the
sort command is executed, a valid Comparator is passed as an argument into the updateSortedCandidateList() method, which
is called from the ModelManager class. Here, the ModelManager class acts as an intermediate layer
which then calls the sortCandidates() method in the AddressBook class.
The sortCandidates() method creates an exact copy of the existing CandidateList currently
in the system, before sorting it by the Comparator passed as its argument and setting
the new CandidateList in the system to be that of the sorted copy.
Why is the feature implemented as such?
1. Modification of ObservableList<Candidate>
The ObservableList<Candidate> accessible by calling getFilteredCandidateList() in the ModelManager class
is an unmodifiable copy. In order to retain the integrity of data accessible through in the ModelManager, the modification of the candidate
list is instead implemented within the AddressBook class. This separates the responsibilities of AddressBook class (which
wraps all data in the system) from the ModelManager class, which provides a slightly higher level of abstraction to access
the in memory data.
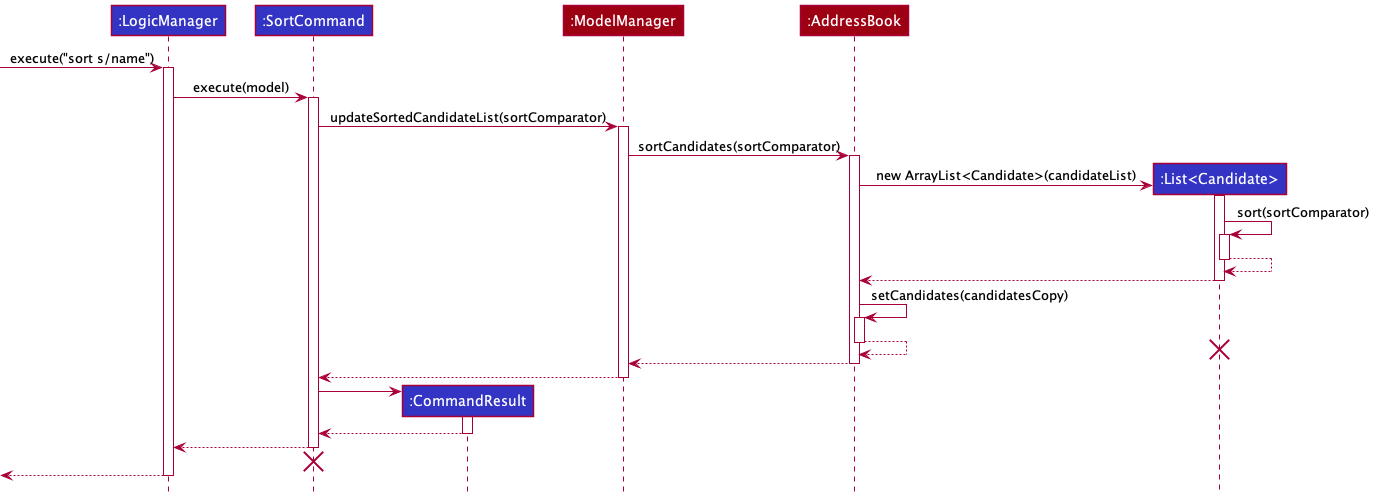
UML Diagrams
The following simplified partial sequence diagram showcases what happened when execute is called from the LogicManager.
Explanation of sequence when a sort s/name is parsed in is explained.
Step 1. (Not shown by diagram) The new SortCommand object is created with the Comparator<Candidate> object passed in as the argument when
the user enters the command.
Step 2. TheSortCommand#execute method is called from LogicManager with the Model object passed in.
Step 3. ModelManager#updateSortedCandidateList is called, where the ModelManager class
implements the Model interface. The Comparator<Candidate> object is passed in as the argument.
Step 4. The AddressBook#sortCandidates is then called where a new copy of the candidate list is created as a List<Candidate> and sorted using the comparator.
Step 5. The candidate list in the system is then set as the new sorted copy using the AddressBook#setCandidates method call.
Step 6. Finally, SortCommand#execute method returns a new CommandResult object with feedback message to be displayed.
Focus Feature
What is this feature about?
The ‘focus’ feature utilises the different panels in our application. It will bring up the intended Candidate’s information, such as course, email into the middle panel for the user to see.
How is this feature implemented?
This feature is implemented with the similar implementation of CandidateListCard, as we utilise the JavaFX codes to
create the view. We also introduced new features such as ImageView, where the extra information will consist of a display
picture for the Candidate.
Why is the feature implemented as such?
We created a new return value in CommandResult to get the Index of the intended Candidate. We implemented it this way
to not alter the existing database, as the intended purpose of this feature was not to edit the candidate’s information.
We considered creating another database for this feature, by fetching more details from the secondary database, but we considered
that this will be a heavy headway for our application.
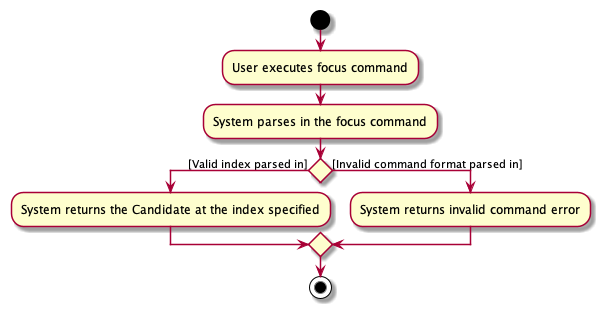
UML Diagram
The following activity diagram summarizes what happens when a user executes a focus command.
Scheduling interviews feature
What is this feature about?
The AddScheduleCommand, EditScheduleCommand, DeleteScheduleCommand and ClearScheduleCommand features allow
the user to add, edit, delete or clear all interviews respectively.
How is this feature implemented?
This feature is modelled after AB3’s add, edit, delete and clear commands for consistency. Interview objects
created upon the schedule add command are contained in a UniqueInterviewList object and exposed to outsiders as
an unmodifiable ObservableList<Interview>.
Why is this feature implemented as such?
-
Alternative 1 (Current Choice): Newly created interviews are added to a list of interviews, and
each interview object contains its corresponding
Candidate.- Pros: No need to iterate through every candidate to initialise the interview schedule. Better performanece when editing or deleting interviews by index in the interview schedule.
- Cons: Editing a
Candidateattribute requires an update to their correspondingInterview’sCandidateobject.
- Alternative 2: Every candidate has an
Interviewattribute, initialised to null. When a candidate is scheduled for an interview, the newly created interview is assigned to be the candidate’sInterviewattribute.- Pros: Editing a
Candidateattribute does not affect theirInterviewattribute. - Cons: Interview schedule has to iterate through every candidate to search for existing interviews during initialisation. Editing or deleting interviews by index from the interview schedule would require further iterations through the candidate list to find the target interview.
- Pros: Editing a
UML Diagram
Below is a simplified sequence diagram showing how an AddScheduleCommand is parsed under the Logic
component when a user adds an interview to the schedule. Note that all four schedule commands AddScheduleCommand,
EditScheduleCommand, DeleteScheduleCommand and ClearScheduleCommand follow a similar structure.
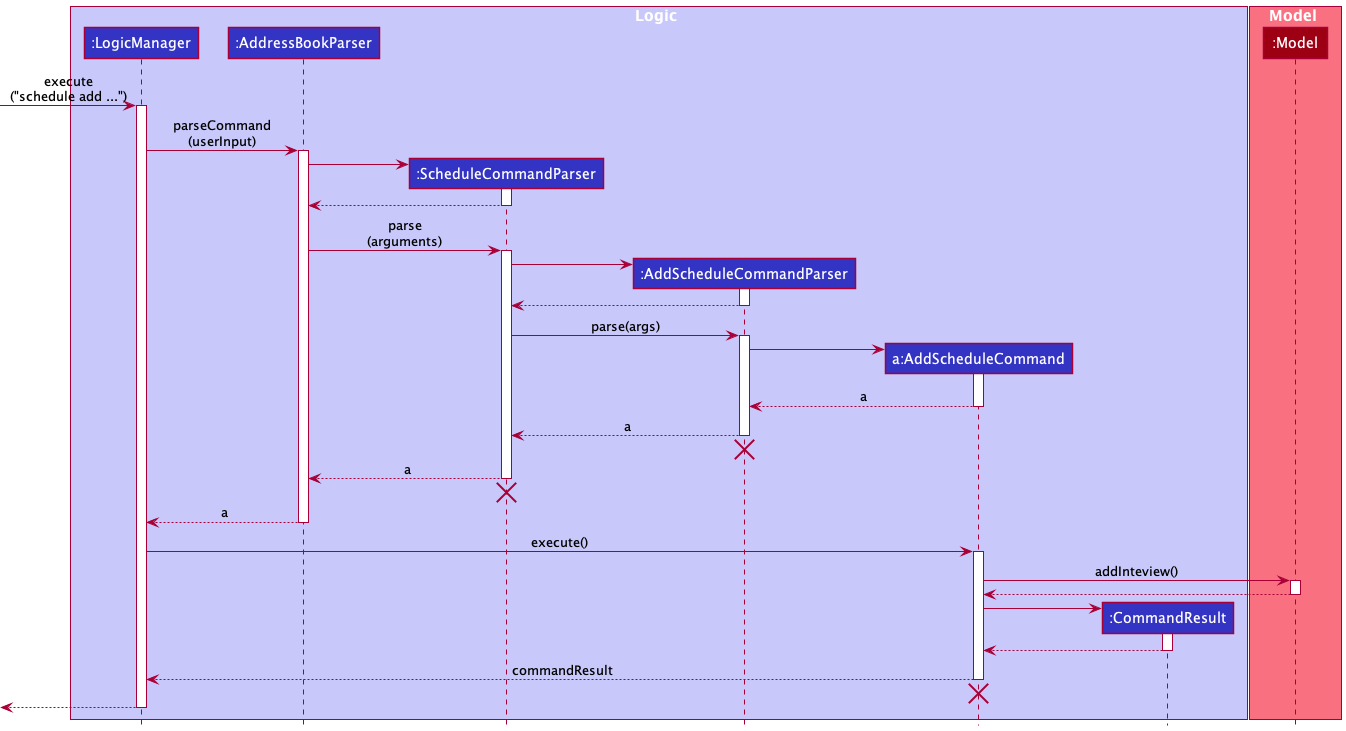
Below is another sequence diagram with a more in depth view of how the AddScheduleCommand is executed after parsing.
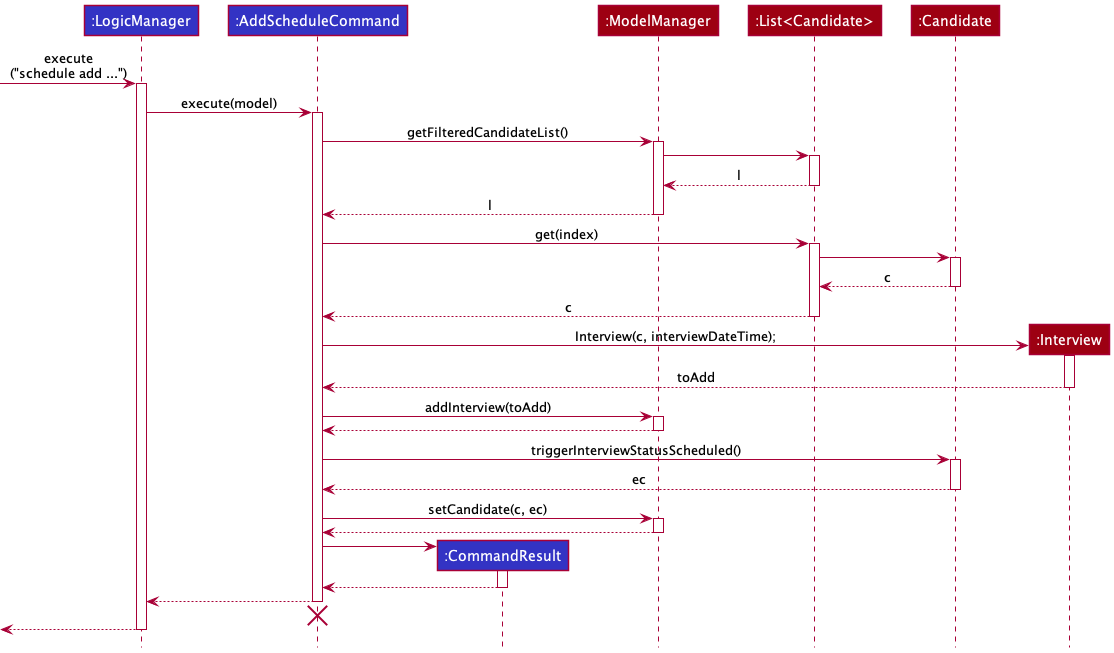
Explanation of sequence when a AddScheduleCommand is called.
Step 1. The user executes the command schedule add candidate/1 at/24-05-2022.
Step 2. User input is passed to the AddressBookParser, which calls ScheduleCommandParser#parse,
which then calls AddScheduleCommandParser#parse to create a new AddScheduleCommand.
Step 3. The AddScheduleCommand will then be executed by calling its execute method.
Step 4. Since the Model is passed to AddScheduleCommand#execute, it is able to call a method Model#getFilteredCandidateList to get the last candidate list shown.
Step 5. From the candidate list, we can find the desired candidate to schedule for interview by calling the get function with the specified Index.
Step 6. A new Interview is created for the candidate and the Model#addInterview method is called to add the Interview to the Model.
Step 7. After the interview is successfully added, we call the Candidate#triggerInterviewStatusScheduled method which returns
the Candidate with his interview status set to Scheduled. The Model will then call Model#setCandidate to update the candidate in the list.
Documentation, logging, testing, configuration, dev-ops
Appendix: Requirements
Product scope
Target user profile:
- Professor from NUS School of Computing
- Needs to manage a significant number of TA applications for a particular module
- Prefers desktop apps to other platform apps
- Possesses fast typing speed
- Prefers typing to mouse interactions
- Reasonably comfortable using CLI apps
Value proposition: TAlent Assistant™ creates a centralized management system for NUS School of Computing professors to manage undergraduate TA applications by providing easy access to candidates’ data to review their general availability for scheduling interviews during office hours.
User stories
Priorities: High (must have) - * * *, Medium (nice to have) - * *, Low (unlikely to have) - *
| Priority | As a … | I want to … | So that I can… |
|---|---|---|---|
* * * |
user | add a candidate to the system | keep track of their application details for consideration. |
* * * |
user | focus on a specific candidate from the system | have a better understanding of the candidate. |
* * * |
user | edit a candidate in the system | correct any wrong inputs when I added this candidate. |
* * * |
user | delete a candidate from the system | remove entries that I no longer need. |
* * * |
user | find a candidate in the system | access details of the candidate without having to go through the entire list. |
* * * |
user | list all candidates in the system | monitor the application pool. |
* * |
user | sort candidates in the system | view the candidates in a more organised manner based on a certain attribute field. |
* * |
user | clear all candidates in the system | start from a fresh list of candidates. |
* * * |
user | view scheduled interviews within a specific time period | keep track of the upcoming interview schedule. |
* * * |
user | schedule TA candidates for interviews | keep track of the interview schedule. |
* * * |
user | retrieve the scheduled interview details of a candidate | work around my schedule for the interview. |
* * * |
user | re-schedule an interview | fit this interview into the candidate’s schedule or even mine. |
* * * |
user | delete an interview | revert the scheduling of the specific candidate. |
* * |
user | clear all interviews in my schedule | remove all upcoming interviews conveniently. |
* * * |
user | update the remark for a candidate in the system | keep a note of important details relating to the candidate. |
* * * |
new user | view all available commands | get familiarised with the system. |
Use cases
(For all use cases below, the System is TAlent Assistant™ and the Actor is the professor, unless specified otherwise)
![]() Notes on the abbreviations: TA - Teaching Assistant
Notes on the abbreviations: TA - Teaching Assistant
Use case: List all candidates in the system
MSS
- User requests to list candidates
- TAlent Assistant™ shows all candidates
Use case ends.
Extensions
- 2a. The list is empty
- 2a1. TAlent Assistant™ feedbacks no candidates in system
Use case ends.
Use case: Add a candidate into the system
MSS
- User requests to add a candidate
- TAlent Assistant™ requests for candidate’s details
- User inputs details
- TAlent Assistant™ adds the new candidate
Use case ends.
Extensions
- 3a. The given format is invalid
- 3a1. TAlent Assistant™ shows an error message
Use case resumes at step 2.
Use case: Edit an existing candidate in the system
MSS
- User requests to edit a candidate
- TAlent Assistant™ requests for candidate’s inputs
- User selects candidate to edit and inputs the updated details
- TAlent Assistant™ edit the specified candidate
Use case ends.
Extensions
- 3a. The given format is invalid
- 3a1. TAlent Assistant™ shows an error message
Use case resumes at step 2.
Use case: Delete a candidate from the system
MSS
- User requests to list TA candidates
- TAlent Assistant™ displays the list of TA candidates
- User requests to delete a specific candidate in the list
- TAlent Assistant™ deletes the candidate from the list and displays the deleted entry
Use case ends.
Extensions
-
3a. The list is empty
Use case ends.
-
3b. The given index is invalid.
- 3b1. TAlent Assistant™ displays an error message
Use case resumes at step 2.
Use case: Schedule a candidate from the system for an interview
MSS
- User requests to list TA candidates
- TAlent Assistant™ displays the list of TA candidates
- User requests to schedule a specific candidate in the list for an interview on a particular date and time
- TAlent Assistant™ schedules the interview and marks the Interview Status of the candidate as Scheduled.
Use case ends.
Extensions
-
2a. The candidate list is empty
Use case ends.
- 3a. The given index is invalid
- 3a1. TAlent Assistant™ displays an error message
Use case resumes at step 3.
- 3b. The given date and/or time format is invalid or in the past
- 3b1. TAlent Assistant™ displays an error message
Use case resumes at step 3.
Use case: Reschedule an interview in the system
MSS
- User requests to view interview schedule
- TAlent Assistant™ displays the list of interviews in the schedule
- User requests to reschedule a specific interview to a particular date and time
- TAlent Assistant™ reschedules the interview to the new date and time
Use case ends.
Extensions
-
2a. The interview schedule is empty
Use case ends.
- 3a. The given (interview) index is invalid
- 3a1. TAlent Assistant™ displays an error message
Use case resumes at step 3.
- 3b. The given date and/or time format is invalid or in the past
- 3b1. TAlent Assistant™ displays an error message
Use case resumes at step 3.
Use case: Delete an interview in the system
MSS
- User requests to view interview schedule
- TAlent Assistant™ displays the list of interviews in the schedule
- User requests to delete a specific interview
- TAlent Assistant™ removes the interview from the schedule
Use case ends.
Extensions
-
2a. The interview schedule is empty
Use case ends.
-
3a. The given (interview) index is invalid
- 3a1. TAlent Assistant™ displays an error message
Use case resumes at step 3.
Use case: Find candidates in the system
MSS
- User requests to find candidates containing specific keyword(s)
- TAlent Assistant™ returns a list of candidates that contain one or more of the given keyword(s) in the specified attribute field
Use case ends.
Extensions
- 2a. No TA candidate entries contain the given keyword in the specified attribute field
- 2a1. TAlent Assistant™ returns an empty list with zero search results
Use case ends.
- 2b. The specified attribute field is invalid
- 2b1. TAlent Assistant™ returns an error message
Use case resumes at step 1.
Use case: Sort candidates in the system
MSS
- User requests to sort candidates by a specific attribute field
- TAlent Assistant™ returns a list of candidates sorted with regard to the specified attribute field
Use case ends.
- 2b. The specified attribute field is invalid
- 2b1. TAlent Assistant™ returns an error message
Use case resumes at step 1.
Use case: View scheduled interviews in the system
MSS
- User requests to view scheduled interviews within a specific time period
- TAlent Assistant™ returns a list of scheduled interviews within the specified time period, sorted from earliest to latest
Use case ends.
- 2b. The specified time period is invalid
- 2b1. TAlent Assistant™ returns an error message
Use case resumes at step 1.
Use case: Update remark of a candidate in the system
MSS
- User requests to update the remark of a candidate in the system
- TAlent Assistant™ returns the candidate with the updated remark in the feedback panel
Use case ends.
- 2b. The candidate specified is displayed in the focus panel
- 2b1. TAlent Assistant™ updates the candidate’s remark displayed
Use case resumes at step 1.
Use case: List available commands
MSS
- User requests to list available commands
- TAlent Assistant™ returns list of available commands and example usages
Use case ends.
Use case: Marks candidate’s application status
MSS
- User wants to edit a candidate’s application status
- TAlent Assistant™ will update the status of the candidate, and display it on the UI.
Use case ends.
- 2a. The status entered by the user is invalid
- 2a1. TAlent Assistant™ returns an error message
Use case ends.
- 2b. The Candidate does not exist
- 2b1. TAlent Assistant™ returns an error message
Use case ends.
Use case: Change the Interview Status of the Candidate
Preconditions: Candidate has an interview scheduled.
MSS
- User wants to change the Interview Status of the Candidate to Completed.
- TAlent Assistant™ will update the Interview Status of the candidate once the interview slot is over.
Use case ends.
- 2a. User deletes the interview slot before the interview starts
- 2a1. TAlent Assistant™ will change the Interview Status of the Candidate to Not Scheduled.
Use case ends.
Use case: User wants to see more details of the Candidate
MSS
- User requests to see more information about the Candidate.
- TAlent Assistant™ will return all the information available for the Candidate selected.
Use case ends.
- 2a. Candidate does not exist in the system.
- 2a1. TAlent Assistant™ returns an error message
Use case ends.
Use case: Clear all candidates in the system
MSS
- User requests to clear all candidates
- TAlent Assistant™ clears all candidates
Use case ends.
Use case: Clear all interviews in the system
MSS
- User requests to clear all interviews
- TAlent Assistant™ clears all interviews in the schedule
Use case ends.
Non-Functional Requirements
- TAlent Assistant™ should work on any mainstream OS as long as it has Java
11or above installed. - TAlent Assistant™ should work on both 32-bit and 64-bit environments.
- TAlent Assistant™ should be able to hold up to 100 candidate entries in the local database with at most 2 seconds delay in performance for typical usage.
- TAlent Assistant™ should be able to hold up to 100 scheduled interview entries in the local database with at most 2 seconds delay in performance for typical usage.
- TAlent Assistant™ should work under common screen resolutions.
- TAlent Assistant™ is for individual use.
- TAlent Assistant™ should work even without Internet connection.
- A user with above average typing speed for regular English text (i.e. not code, not system admin commands) should be able to accomplish most of the tasks faster using commands than using the mouse.
- The response to any user action should become visible within 3 seconds.
- Colors used for the user interface should be pleasant and not straining on the eyes.
Glossary
- Mainstream OS: Windows, Linux, Unix, macOS
- TA: Teaching Assistant
- 32/64-bit environment: A system that uses a 32/64-bit processor
- System admin commands: Commands that are used on the terminal interface
- CLI: Command Line Interface
- GUI: Graphical User Interface
Appendix: Instructions for manual testing
Given below are instructions to test the app manually.
Launch and shutdown
-
Initial launch
-
Download the jar file and copy into an empty folder
-
Double-click the jar file Expected: Shows the GUI with a set of sample candidates. The window size may not be optimum.
-
-
Saving window preferences
-
Resize the window to an optimum size. Move the window to a different location. Close the window.
-
Re-launch the app by double-clicking the jar file.
Expected: The most recent window size and location is retained.
-
-
Resizing panels
-
Resize the bottom panels accordingly. Close the window.
-
Re-launch the app by double-clicking the jar file
Expected: The panels will be resized to its default size. All three panels will have equal width.
-
Adding a candidate
-
Adding a candidate into the system
-
Test case:
add id\A0123456B n/John Doe p/87654321 e/E0123456@u.nus.edu c/Computer Science yr/2 avail/1,2,3
Expected: 1st parameter is incorrect. It should beid/A0123456Bwith a forward slash/. All prefixes and its value are tied with a forward slash/. -
Test case:
add id/A0123456B
Expected: All attributes of aCandidateshould be present in theaddcommand. An error message will be shown with the fulladdcommand statement. -
Test case:
add id/A0123456B n/John Doe p/87654321 e/E0123456 c/CS yr/2 avail/monday,tuesday,wednesday
Expected: There are invalid values foremail,courseandavailability. All values provided in theaddcommand will be validated by the system.
-
Editing a candidate
-
Editing a candidate while all candidates are being shown
-
Prerequisites: System contains only two candidates, candidate 1 is:
id/A0654321B n/Jane Doe p/81234657 e/E0654321@u.nus.edu c/Computer Science yr/2 avail/1,2,3and candidate 2 is:id/A0123456B n/Peter Parker p/87654321 e/E0123456@u.nus.edu c/Computer Science yr/2 avail/1,2,3 -
Test case:
edit 1 n/Mary Jane
Expected: First candidate’s name has been updated to show Mary Jane. -
Test case:
edit 0 n/Mary Jane
Expected: No candidate is edited. An error message will be shown. -
Test case:
edit 1 id/A0123456B p/87654321 e/E0123456@u.nus.edu
Expected: Parameters to be edited belongs to another candidate in the system. An error message will be shown. -
Test case:
edit 1 id/A0123456B n/Jane Doe p/87654321 e/E0123456 c/CS yr/2 avail/monday,tuesday,wednesday
Expected: There are invalid values foremail,courseandavailability. All values provided in theeditcommand will be validated by the system.
-
Deleting a candidate
-
Deleting a candidate while all candidates are being shown
-
Prerequisites: List all candidates using the
listcommand. Multiple candidates in the list. -
Test case:
delete 1
Expected: First candidate is deleted from the list. Details of the deleted candidate shown in the status message. -
Test case:
delete 0
Expected: No candidate is deleted. Error details shown in the status message. Status bar remains the same. -
Other incorrect delete commands to try:
delete,delete x,...(where x is larger than the list size)
Expected: Similar to previous.
-
Scheduling an interview
-
Adding an interview into the system
-
Prerequisite: List all candidates using the
listcommand. Multiple candidates in the list. -
Test case:
schedule add 1 at/03-08-2022
Expected: 1st parameter is incorrect. It should becandidate/1with a forward slash/. -
Test case:
schedule add candidate/1
Expected: TheDATE_TIMEof anInterviewshould be present in the ` schedule add` command. Error details shown in the status message. -
Test case:
schedule add candidate/1 at/03/08/2022
Expected: TheDATE_TIMEof an interview must be in the formatdd-MM-yyyy. Error details shown in the status message. -
Test case:
schedule add candidate/1 at/20-02-2000
Expected: TheDATE_TIMEof an interview must not be in the past. Error details shown in the status message. -
Test case:
schedule add candidate/1 at/03-08-2022
Expected: Interview is successfully added to the schedule. Details of interview shown in the status message.
Note: The candidate must be available on the givenDATE_TIME.
-
Deleting an interview
-
Deleting an existing interview in the system
-
Prerequisite: View all interviews using the
view allcommand. Multiple interviews in the schedule. -
Test case:
schedule add 1 at/03-08-2022
Expected: 1st parameter is incorrect. It should becandidate/1with a forward slash/. All prefixes and its value are tied with a forward slash/. -
Test case:
schedule delete 1
Expected: First interview is deleted from the list. Details of deleted interview shown in the status message. -
Test case:
schedule delete 0
Expected: No interview is deleted. Error details shown in the status message. -
Other incorrect delete commands to try:
schedule delete,schedule delete x,...(where x is larger than the list size)
Expected: Similar to previous.
-
Viewing the interview schedule
-
Viewing the interview schedule for a specific time period
-
Prerequisites: Schedule an interview using the
schedule addcommand that is within 7 days of the current date and time. Schedule another interview using theschedule addcommand that is after 7 days but within 14 days of the current date and time. -
Test case:
view week
Expected: The earlier interview scheduled within 7 days of the current date and time is displayed in the interview panel. The other interview scheduled after 7 days of the current date and time is not displayed. Number of interviews listed is displayed in the feedback panel. -
Test case:
view
Expected: No change to the interview schedule already displayed. Error message is shown in the feedback panel. -
Other incorrect view commands to try:
view this week,view xxx(where ‘xxx’ is any string other than the accepted keywordsall,today,weekormonthfor time period specified)
Expected: No change to the interview schedule already displayed. Error message is shown in the feedback panel.
-
Updating a candidate’s remark
-
Updating a candidate’s remark while the candidate is displayed in the focus panel
-
Prerequisites: List all candidates using the
listcommand. Multiple candidates in the list. Bring up the details of the first candidate listed to the focus panel using thefocus 1command. -
Test case:
remark 1 r/
Expected: Remark for candidate at index 1 in the displayed candidate list is removed. Focus panel updates to display the remark field asNo remark added!. Details of the candidate with the updated remark is shown in the feedback panel. -
Test case:
remark 1 r/updated remark
Expected: Remark for candidate at index 1 in the displayed candidate list is updated. Focus panel updates to display the remark field asupdated remark. Details of the candidate with the updated remark is shown in the feedback panel. -
Incorrect remark commands to try:
remark 0,remark 1 r,remark r/
Expected: No update to remarks of any candidate. Error message is shown in the feedback panel.
-
-
Updating a candidate’s remark while only some candidates are being shown
-
Prerequisites: List all candidates using the
listcommand. Multiple candidates in the list. Bring up the details of the first candidate listed to the focus panel using thefocus 1command. Use thefindcommand to display a new filtered list of candidates excluding the first candidate previously listed. -
Test case:
remark 1 r/new remark
Expected: Remark for candidate at index 1 in the currently displayed candidate list is updated tonew remark. Details of the candidate with the updated remark is shown in the feedback panel. Focus panel does not update the remark of the currently displayed candidate.
-
Sorting candidates in the system
-
Sorting candidates while all candidates are being shown
-
Prerequisites: List all candidates using the
listcommand. Multiple candidates in the list. -
Test case:
sort s/name
Expected: All candidates are sorted in case-insensitive alphanumerical order 0-9, A-Z based on each candidate’s displayed name. Number of candidates sorted is shown in the feedback panel. -
Test case:
sort s/name s/course
Expected: The last sorting keycoursewill be utilised and verified. All candidates are sorted in case-insensitive alphanumerical order 0-9, A-Z based on each candidate’s displayed course. Number of candidates sorted is shown in the feedback panel. -
Incorrect sort commands to try:
sort,sort s/xxx(where xxx is an invalid attribute field to be sorted by)
Expected: No change to the list of candidates already displayed. Error message is shown in the feedback panel.
-
-
Sorting candidates while only some candidates are being shown
-
Prerequisites: List all candidates using the
listcommand. Multiple candidates in the list. Use thefindcommand to display a new filtered list with fewer candidates. Multiple candidates in the filtered list. -
Test case:
sort s/name
Expected: Currently displayed candidates are sorted in case-insensitive alphanumerical order 0-9, A-Z based on each candidate’s displayed name. Number of candidates sorted is shown in the feedback panel.
-
Finding candidates in the system
-
Finding a candidate from existing candidates in the system
-
Prerequisites: Add a new candidate with the name
Alex Changusing theaddcommand. -
Test case:
find k/Alex f/name
Expected: Only candidates containingAlexin their names (case-insensitive) should be displayed. Previously added candidate with the nameAlex Changshould be displayed. Number of candidates found and displayed is shown in the feedback panel. -
Test case:
find k/Alex f/
Expected: Only candidates containingAlexin any of their valid searchable attribute fields (case-insensitive) should be displayed. Previously added candidate with the nameAlex Changshould be displayed. Number of candidates found and displayed is shown in the feedback panel. -
Incorrect find commands to try:
find,find f/xxx(where xxx is any invalid attribute field to search by)
Expected: No change to the list of candidates already displayed. Error message is shown in the feedback panel.
-
Bringing candidate data to center panel
-
Loading up
Candidate'sdetails into the center panel in the application.-
Test case:
focuson aCandidatein the system.
Expected: TheCandidate'sinformation will be shown on the center panel. -
Test case:
focuson anINDEXthat is out of bounds.
Expected: NoCandidatewill be shown in the center panel, and an error message will be displayed. -
Test case:
schedule clearwhenCandidate'sinformation is currently displayed on the center panel.
Expected:Candidate'sinterview schedule will be automatically refreshed on the center panel. -
Test case:
schedule addwhenCandidate'sinformation is currently displayed on the center panel.
Expected:Candidate'sinterview schedule will be automatically refreshed on the center panel. -
Test case:
schedule editwhenCandidate'sinformation is currently displayed on the center panel.
Expected:Candidate'sinterview schedule will be automatically refreshed on the center panel. -
Test case:
edit as/whenCandidate'sinformation is currently displayed on the center panel.
Expected:Candidate'sApplicationStatuswill be automatically refreshed on the center panel. -
Test case:
editother attributes ofCandidatewhenCandidate'sinformation is currently displayed on the center panel.
Expected: The center panel will be cleared. -
Test case:
clearwhenCandidate'sinformation is currently displayed on the center panel.
Expected: The center panel will be cleared.
-
Saving data
- Dealing with missing data files
-
Prerequisites: Missing
data/talentassistant.json. -
Test case: Delete
data/talentassistant.jsonand relaunch the application.</br> Expected: Application will be populated with sample data.
-
- Dealing with corrupted data files
-
Prerequisites:
data/talentassistant.jsonis modified to contain invalid details. -
Test case: Modify a
Candidate’s phone number to start with any digit other than 6, 8 or 9 and launch the application.</br> Expected: Application will start without any data. -
Test case: Modify a
Candidate’s phone number to start with any digit other than 6, 8 or 9 while the application is running.</br> Expected: Application continues to run smoothly.
-